
RECIPE: Fresh Flavors for your Winter Kitchen
Recipes for storage and frozen Vegetables
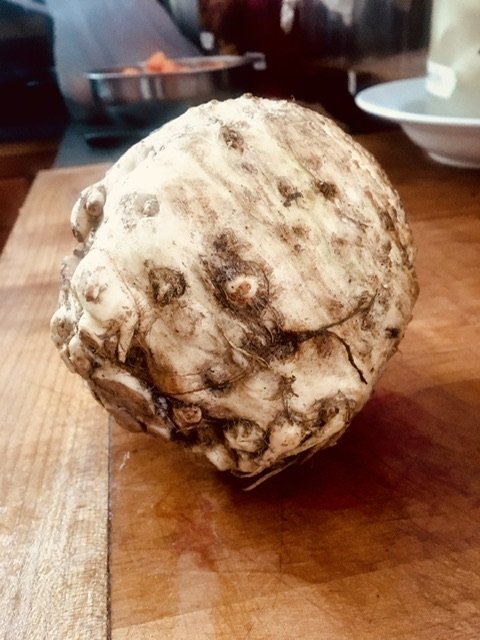
Celeriac, aka celery root, keeps for many months in refrigeration. Don’t be deterred by its rough exterior- the flesh of this storage vegetable is tender and delicately flavored.
This week temperatures fluctuate between 40F and -10F (wind-chill aside), my driveway fluctuates between a puddle of slush and a treacherous ice rink, and a minute of sunshine is followed by howling wind and snow flurries. It’s nearly March and, in short, it’s a dynamic time of year here in Missoula.
Here are a few recent strategies and recipes I’ve used to keep things fresh. They include a raw celeriac slaw, a zesty recipe for quick(ish)-pickled beets, Farmer Greg’s method for the best roasted green beans, and general tips for thawing and cooking frozen vegetables.
The kitchen needn’t be subsumed by the gloom- fill your plate with bright, fresh flavors to snuff the winter blues.
storage vegetables
Carrots, parsnips, potatoes, beets, kohlrabi, winter squash, celeriac, garlic and onions are all members of the storage veggie club. With proper storage (some prefer refrigeration while others do better in slightly warmer temperatures) these individuals can chill (pun intended) for months on end without spoiling.
This season is dominated by roasted, stewed and otherwise well-cooked vegetables and these recipes are the antidote, bringing color to the plate and zest to the palate.
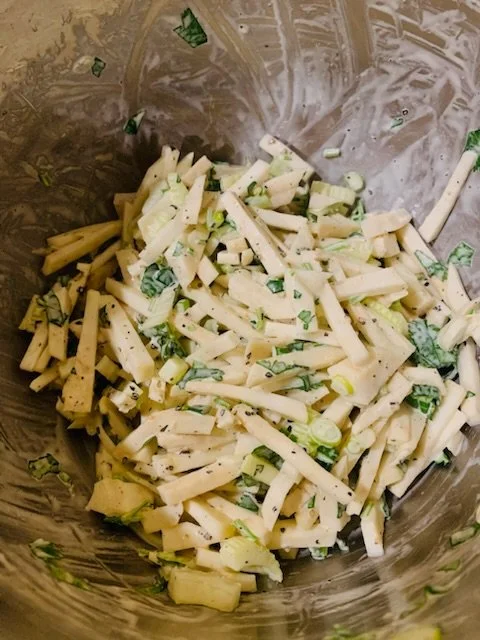
CRUNCHY CELERIAC SLAW (aka REMOULADE)
Celeriac is also know as celery root. Straight from the field, celeriac appears as a hearty knob topped with pungent leaves and fringed by gnarled roots, both of which are trimmed away prior to storage. Celeriac is, unsurprisingly, related to celery as well as parsley, parsnips, carrots and dill (all members of the carrot family, Apiaceae).
This recipe includes additional raw ingredients in the form of herbs and celery. Grown in the greenhouses of local farmers, they show up at the Missoula Valley Winter Market every weekend.
INGREDIENTS
1 large celeriac (about the size of a softball)
1 teaspoon lemon juice
¼ teaspoon sea salt
2 tablespoons mayonnaise
1 tablespoon dijon mustard
1 tablespoon olive oil
½ cup finely chopped fresh herbs (parsley, cilantro, scallions, etc)
½ cup finely diced celery
Black pepper to taste
INSTRUCTIONS
Peel celeriac.
My preferred method: Begin by cutting off both the root and stem ends of the vegetable. This creates two flat sides to stabilize this otherwise round-ish vegetable. Place the celeriac on one of its cut sides and, using a large knife, peel the skin. Flip the vegetable onto its other flat side and ensure that all the skin has been removed.
While the celeriac’s skin may appear tough, it is actually quite thin and you should be able to remove it with little waste.
Julienne celeriac.
My preferred method: Cut the celeriac in half from top to bottom. Slice each half into thin (⅛-¼ inch) half-moon shaped slices. Holding each half together, cut the slices into strips, ⅛-¼ inch thick.
In a medium-sized mixing bowl, toss the celeriac in the lemon juice and salt and set aside.
In another medium-sized bowl, whisk together mayonnaise, dijon and olive oil. Scrape celeriac over the mayonnaise mixture, add herbs, celery and black pepper. Toss to combine.
Let salad sit for 30 minutes, then sample and adjust salt, lemon juice and black pepper to taste.
NOTES FOR KITCHEN NERDS
What’s the difference between a slaw and a remoulade? Slaw is slang for coleslaw, and coleslaw refers to a dressed salad that specifically uses cabbage (derived from dutch “kool” meaning cabbage and “sla” meaning salad). While the words “celeriac” and “remoulade” may cause consternation amongst your fellow diners, don’t panic! All concerns will be put to rest after the first tastes.
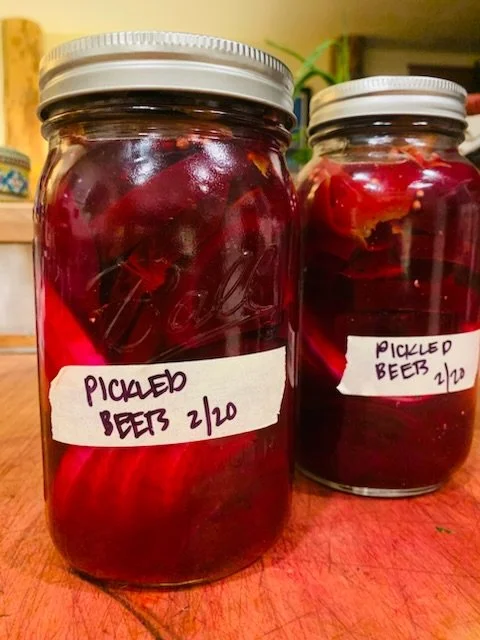
QUICK(ISH) PICKLED BEETS
I had to take action with bottom-of-the-bag beets that had been patiently waiting in the back of the fridge. They had gotten a little soft and a few had sprouted tiny new leaves. Otherwise, they appeared as fresh as they were when they entered the refrigerator nearly 5 months ago.
This recipe is for anyone who has yet to delve into making their own pickles. The ingredient quantities are loose because quick-pickling is hardly an exact science. More often it is a way of pushing pause on excess vegetables. Pickled beets are toothsome—soft but not mushy—and ready to absorb any flavor you add to the jar. I say “quick-ish” simply because cooking the beets takes some time.
INGREDIENTS
Several beets
Salt, ½ teaspoon per quart
Sugar, ½ teaspoon per quart
Black pepper to taste
Whole cloves, 1-2 per quart (optional)
Whole coriander seed, ¼ teaspoon per quart (optional)
Red Onion, thinly sliced (optional)
5% Vinegar of choice (e.g. apple cider, rice), to cover half way
Water, to cover the other half
INSTRUCTIONS
Cook beets.
My preferred method: Place beets in a pot with water to cover. Bring to a boil over high heat, then cover and simmer until tender (30-45 minutes depending on size of beets). Remove from heat, drain and let cool.
Roasting your beets whole is also an option. A common method is to wrap the beets in tin foil and place in a 400F oven until tender.
Peel and slice beets. Remove skins from beets (should be easily removed by hand) once cool enough to handle. Halve or quarter beets if very large. Cut beets into ¼ inch slices.
Pack into jars. Transfer beets to an appropriately sized jar, layering with onion if you would like (onion is optional). Add remaining ingredients and finish by covering the beets half way with vinegar and then filling the jar up to the top with water to submerge the beets. Close your lid tightly and shake vigorously to mix ingredients.
Refrigerate.
Beets will take on a pickled flavor within an hour. Flavor improves with time. Keep refrigerated and enjoy liberally.
frozen vegetables
Blanching and freezing vegetables is a quick and easy preservation method. So easy, in fact, that you may end up with more frozen vegetables than you know what to do with. My favorite blanch-and-freeze veggies are broccoli, green beans, kale and cauliflower, and I am still learning how much of each I should put away to last me through the winter.
While frozen vegetables can take the pressure off of meal making, they can be finicky and disappointing if your preparation goes awry. Use these tips to make the most of your frozen vegetables.
A reminder from Farmer Greg: Don’t expect your frozen vegetables to maintain the texture of fresh vegetables. They will have inevitably lost some of their crunch on their journey from field to freezer, but that doesn’t mean they can’t make for a delicious meal!
Methods for thawing:
The National Center for Home Food Preservation states that foods can be safely thawed in the refrigerator, in cold water or in a microwave.
Martha Stewart concludes that the refrigerator method is preferable to the microwave, reducing changes of mushiness. Unfortunately the refrigerator method is also the slowest method, so I tend to use cold water to thaw my veggies.
In the refrigerator: Your vegetables will lose liquid as they thaw. If you are keeping them in a freezer bag, be sure to place the bag in a dish to catch any water leakage. You can also transfer them from their freezer bag into another container to thaw. Drain before cooking.
In cold water: Additional water always seems to find its way into my freezer bags when I use this method. Drain before cooking, and consider patting your vegetables dry if they’re really soggy.
Straight into the skillet: If your frozen veggies are loose—maybe you froze them on a sheet pan before bagging them up, or you’re using peppers or tomatoes that are generally frozen fresh and thus don’t freeze into a solid brick—they can be added, still frozen, to your skillet or oven to thaw as they cook.
Methods for cooking:
Don’t over-cook! Most vegetables are blanched, steamed or otherwise cooked before going into the freezer. This halts enzymatic action and lengthens their freezer lifespan. After thawing, your vegetables can be heated or even browned, but remember that they are prone to mushing.
In the oven:
Use higher temperatures (400F or higher) to heat quickly. Toss vegetables in oil and seasoning, spread them on a baking sheet or roasting pan in a single layer and roast until heated through and beginning to brown, about 15 minutes. Turn on the broiler once veggies are warm to brown.
See Farmer Greg’s recipe below for sheet-pan green beans.
On the stove:
Frozen veggies can be added to stir-fries and soups, or enjoyed as a simple side.
I like to use medium heat for bulkier items (broccoli, cauliflower). Heat your skillet, add enough oil to thinly coat the bottom, then add your vegetables in a single layer. Allow veggies to cook undisturbed until browned on one side. Flip vegetables and repeat process for the other side.
I use higher heat for thin vegetables such as green beans and peas in their pod. Heat your skillet over medium-high or high heat, add oil, then add your vegetables. Stir every 30 seconds until vegetables are heated through and begin to blister, about 2 minutes.
FARMER GREG’S OVEN GREEN BEANS
After 25 years of farming with Garden City Harvest, Greg Price has mastered the art of preserving summer’s bounty. This is one of his favorite winter concoctions, combining green beans, onions, and garlic all grown in his fields. Adding mushrooms to this sheet-pan meal, he says, reminds him of a green bean casserole.
INGREDIENTS
1 pound frozen green beans, thawed and drained
4 ounces mushrooms, finely sliced
¼ cup minced onion
2 garlic cloves, minced
2 tablespoons olive oil
½ tsp salt, more to taste
Freshly ground black pepper
OPTIONAL ADDITIONS
Caramelized onion
Grated cheese, e.g. parmesan
INSTRUCTIONS
Heat oven to 400F
In a large mixing bowl, mix all ingredients (see note for optional additions).
Spread evenly on a baking sheet and place in oven.
Bake until vegetables begin to brown, 15-25 minutes.
NOTE
To caramelize onions, heat 2 tablespoons butter or olive oil in a skillet over medium heat. Slice a medium onion and add to the skillet. Toss onion in fat, then reduce heat to prevent browning. Cook on low, stirring every few minutes, until onions have lost their structure completely and begin to turn golden.
Mix caramelized onions in with the other ingredients before baking.
Add grated cheese once ingredients are heated through but before they are browned, about half way through the baking process.
If you prefer chunkier mushrooms, chop according to preference and cook in a skillet over medium heat until they begin to sweat.
Mix these partially cooked mushrooms in with the other ingredients to finish cooking.