
Greens and the Benefits of Blanching

This mound of blanched greens, now one meal’s worth, was 4 pounds fresh! Included here: 1 bunch mustard greens, 1 bag spinach, 1 bunch chard, 1 head tat soi, and the tops off my bunch of salad turnips.
Is your mouth watering at the thought of blanched greens? No?
While it might not sound appealing (no offense to any Blanches in the room) blanching vegetables is transformative. A quick blanch brightens the color, tames the bitterness and maintains the crunch of nearly every veggie in the book.
Greens Overwhelm?
In that moment of greens overwhelm -- when the kale, lettuce, chard and mustards are battling for fridge space -- blanching will help you reclaim your sanity and your fridge space while simultaneously allowing you to consume large amounts of tasty, nutritious greens.

Greens blanched and squeezed of their liquid. This technique radically reduces the volume of greens and is a great first step for many recipes.
Blanching Pros:
Presses pause on decomposition. We could dive into the effect of temperature on enzymatic action, but I’m guessing it’s better to leave that for another time. In short, blanching buys you time.
Increases availability of certain vitamins (A & K in particular).
Takes up less storage space. It’s remarkable how a bunch of kale reduces to a handful of concentrated greens after blanching!
Improves texture? Some folks are raw fanatics. Others, like myself, find the less-brittle-yet-still-crunchy texture to be delectable.
Improves flavor? Another controversial opinion, but I stand by it! Blanching erases all traces of bitterness. Note: it also erases the heat from mustard greens for better or worse, depending on preference.
Improves digestibility. If you’ve got a finicky digestive system, raw hearty greens can cause some distress. Cooking them makes them easier for your tummy and gut to process.
Blanching Cons:
Uses lots of water! You’ll be using a large pot of boiling water and a large bowl of cold water. I use it to water my plants once I’m finished in the kitchen (and once the hot water has cooled of course).
Time consuming. It’s an added step to any recipe which, in a pinch, might feel overly complicated.
Decreases the amount of vitamin C and other heat-sensitive nutrients.
which greens
A tender lettuce would nearly disappear if blanched, but lettuce soup is regaining popularity so I won’t rule it out.
Tender greens (lettuce, spinach, arugula) clump and can be difficult to disentangle when blanched. For this reason I’d suggest using them in a recipe in which they will be further blended or finely chopped (see recipes for Saag and Greek Greens Pie below).
Hearty greens (kale, collards, chard, broccoli greens, mustard greens) continue to hold some shape after blanching and can be used more like salad greens (see recipe for Montana Seaweed Salad).
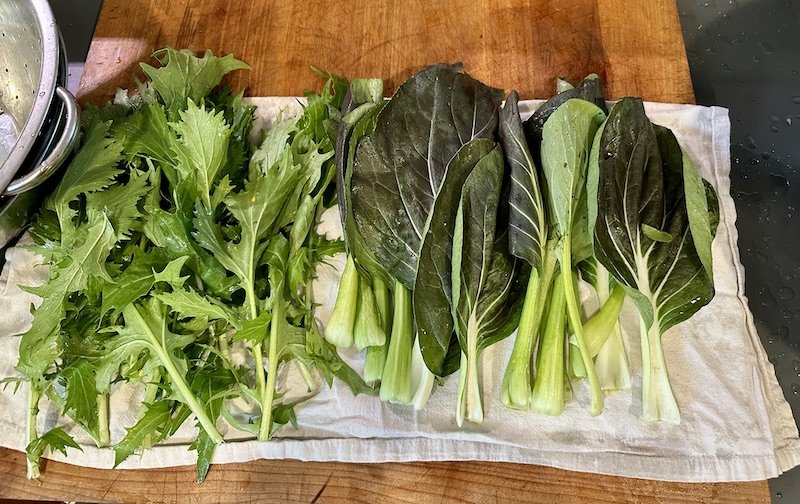
Mizuna (left) and Tatsoi (right) are two varieties of mustard greens we commonly grow on our farms. Both are mild in flavor and are great candidates for blanching or fresh eating.
Greens-intensive recipes
how to blanch
In short:
Add veggies to a large pot of boiling water
Cook until bright green (2 - 3 min)
Transfer to a cold-water bath to prevent over cooking
Drain and enjoy
This blog details the blanching process with the added step of freezing for long-term storage. If you’re feeling truly inundated with greens, consider freezing the extras. You’ll be glad you did come colder times.
More in-depth:
Prep Greens according to recipe and preference. Greens can be blanched whole or chopped. Thick stems will take longer to cook than the more tender leaves. For greens with thick stems (e.g. bok choy, tatsoi, chard) consider removing stems and blanching separately.
Bring a large pot of water to a boil. The standard blanching ratio is one pound of produce per gallon of boiling water. If it takes longer than one minute for the water to return to a boil after the produce is added, the ratio of produce to water is off.
Blanch until greens are bright green. This won’t take more than 2 minutes, even for heartier greens. Stems could take up to 3 minutes to soften. Check throughout.
Transfer greens to the cold water ice bath. This halts the cooking process.
Drain and dry. Once cool, transfer greens to a colander, squeezing out as much water as possible.
montana seaweed salad
This addictive yet simple salad keeps incredibly well, though I challenge you to keep it around for longer than a day or two. It reminds me of the seaweed salad, Wakame, that I’m obsessed with in Japanese cuisine, thus my corny title. There’s no seaweed in this salad (just as there is no sea in Montana!).

This quick, blanched salad is a great way to pack in some greens at breakfast, lunch, dinner, or anytime in between.
INGREDIENTS
1 large bunch hearty greens such as kale or collards, stemmed and thinly sliced (¼ inch wide strips)
1-2 green onions, thinly sliced
2 tablespoons sesame oil
1 tablespoon rice vinegar
2 teaspoons soy sauce or tamari
Sprinkle of chili flakes to taste
Sprinkle of sesame seeds
INSTRUCTIONS
Blanch leaves and stems separately, making sure to transfer them to the cold water bath to halt the cooking process.
Combine remaining ingredients in a large bowl.
After squeezing as much liquid as possible from the greens, combine with the dressing and toss. It might be useful to detangle the greens by hand to ensure an even distribution of dressing.
Enjoy at room temperature or chilled. Can be made into a delicious nest for your favorite protein.
SAAG
Derived from the Sanskrit word for leafy green vegetables, Saag is a popular Indian dish chock full of greens bathed in aromatic spices.
While many Saag recipes call for frozen spinach, blanched greens of most any variety are a perfect seasonal substitute.
Recipe adapted from Saag Paneer by Aarti Sequeira
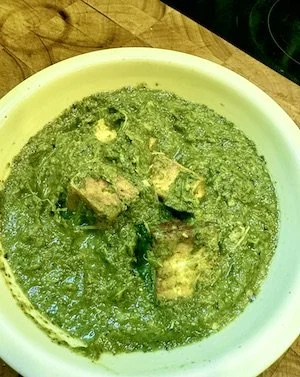
Paneer, a mild Indian cheese, is often fried and added to Saag before serving. With or without added proteins, Saag is filling and delectable.
INGREDIENTS
1 pound greens of any variety (spinach, mustards, and chard are my favorites for this recipe)
2 tablespoons neutral oil
1 large onion finely chopped (seasonal substitute: green onion)
4 cloves garlic (seasonal substitute: green garlic)
1 thumb-sized piece fresh ginger, minced (1 tsp ground)
½ thumb-sized piece fresh turmeric, minced (½ tsp ground)
1 teaspoon garam masala (the original recipe contains instructions on how to make your own!)
2 teaspoons coriander seeds
1 teaspoon cumin seeds
1 teaspoon chili flakes (or to taste)
1 teaspoon sea salt, adjusted to taste
INSTRUCTIONS
Blanch greens. Separate by variety if you’re using a mix of greens of different textures. Roughly chop. Remove thick stems (if present), chop and blanch separately.
Transfer to the cold water/ice bath to halt the cooking process.
Heat oil in a large skillet over medium.
Add onions and cook until translucent, 3-5 minutes, stirring frequently.
Add remaining ingredients and continue cooking until onions have caramelized, about 15 minutes. You may need to lower the heat to prevent burning and/or add a splash of water if things begin to stick.
Add drained greens along with a healthy splash of water and stir to combine.
Remove from heat and puree until smooth. I prefer an immersion blender to reduce dishes, but a standard blender or food processor also work well.
Taste for salt.
GREEK GREENS PIE BY GREG PATENT
Go straight to the source for this perfect creation.
This recipe swept me away over a decade ago when it was published in the Missoulian. It is my first response to greens overwhelm and introduced me to the blanching tactic which, in a recipe like this, is essential to eliminate the possibility of sogginess.
This is a great opportunity to consider seasonal substitutions. Patent calls for a particular combination of greens, but I encourage you to use whatever you have on hand so long as it amounts to about a pound in total. The alliums (leeks and scallions) and herbs (parsley and dill) can also be adjusted based on what’s available fresh and local.
WHO’S WHO
This cute blog walks you through the most commonly grown greens on our farms.
And this printable handout can serve as a friendly reminder (stuck on the front of your refrigerator perhaps?) of which greens you’ve got on hand.